So I'm making this just a quick update, since I'm not actually on my home computer (all my photos are on that one), but I have some seriously exciting foodz coming up!
1. Chili-Lime Vegetable Kebabs (since it's that grilling time of the year). It's a mixture of sweet peppers, onions, mushrooms, zucchini, yellow squash, and tomatoes marinated in a spicy chili-lime sauce.
2. Strawberry Shortcake Cupcakes!! You know me and vegan cupcakes. I can't resist a challenge and what summer BBQ is complete without strawberry shortcake? Since I'm avoiding most soy, I decided to go a different route and make cupcakes that had the summery flavor I desired rather than making a shortcake and using some soy-based whip. These little cuppycakes have a cake that is nice and moist, but not too sweet (like real shortcake), filled with a vanilla cream, and topped with sliced strawberries. They're pretty AND delicious!
I also have a couple of recipes I've been meaning to post for quite sometime, including:
3. Coconut Pie Pancakes (pancakes are my fifth food group)!
4. Carob Chip Banana Bread (new and improved).
And my hearty breakfast (lunch, snack, and dinner...) staple:
5. Biscuits! I don't know what kind of Midwest vegan I would be without a go-to biscuit recipe. I've worked this recipe to perfection and it only takes 15 minutes to whip up a batch of these babies. I usually double it!
And I'm sure there's more cause I've been slacking in the recipe department. Have a safe Memorial Day, and please remember it's not just about having a BBQ and getting schnockered.
Sunday, May 30, 2010
Wednesday, May 19, 2010
The BEST Chocolate Chip Cookie You've Had in Ages
 Enlarged to show texture!!
In my many adventures in vegan baking, I've made a crap ton of cookies. Seriously, who doesn't love a cookie? I used to use other people's recipes that I found online, and you know what? Some of them were terrible. I'm sure all of us can say we've ate some bad cookies. If they didn't just taste funky, they were too dry, or crumbly, or even sticky or overtly sweet. Even nowadays when I'm browsing recipes in the blog world I see cookie recipes that make me shudder (there's no way you can add a crap ton of maple syrup to flour and toss in some nuts and magically make a good cookie).
So, like the good little vegan I am, I didn't criticize it, I veganized it! And what resulted was the most SERIOUSLY AWESOME vegan cookie I've ever had the pleasure of eating. This cookie tastes exactly like you used to eat (only better) and there's no funky tastes of compromises in texture. Pure deliciousness. And I'm not gonna lie... it's pure dessert. Just the way a cookie should be!
Note: When making these cookies I use no-sugar-added applesauce as the egg substitute. A lot of people use bananas, which is awesome if you want a banana-flavored cookie, but I wanted no hint of fruit flavor whatsoever and applesauce is perfect for that. I also like to use the Enjoy Life brand of chocolate chips for two reasons: (1) they're tiny and cute (who doesn't love mini chocolate chips??) and (2) there's only three ingredients in them and for me, less is more! (Did I also mention that they're delicious and not ridiculously expensive?).
These cookies are an awesome basic recipe, so feel free to create with it to your heart's content. I foresee oatmeal-chocolate chip ones in my near future. Now if only there were some vegan butterscotch chips...
Chocolate Chip Cookies:
(Better than your Mom's... and definitely not healthy!)
2 1/2 c. unbleached all-purpose flour
1 tsp. baking soda
1/2 tsp. salt
1/2 tsp. cinnamon (optional, but it gives a nice hint o' flavor)
1/2 c. vegan margarine, softened
1/2 c. non-hydrogenated shortening
1 c. packed brown sugar
1/2 c. granulated white sugar (gasp!)
1/3 c. no-sugar-added applesauce
1 tsp. vanilla
1 c. Enjoy Life chocolate chips (or your favorite)
1/2 c. chopped walnuts, optional
1. In a medium bowl, sift together the flour, soda, salt, and cinnamon (I stir it up with a whisk, does almost the same thing).
2. In a large bowl, beat together the butter and shortening until creamed. Add the brown and white sugars and beat until fluffy.
3. Add the applesauce and vanilla and beat until combined.
4. Add the dry ingredients to the beaten mixture, beating until well-combined.
5. Stir in the chocolate chips and nuts, if using.
6. Drop onto an ungreased cookie sheet by the tablespoonful and bake at 350 for 10 minutes. If you take them out while they're still wet-looking on top (but set), they will remain chewy. Let cool on sheet for about a minute then place on a wire rack (or dinner plate!). Enjoy!
This makes about 3 dozen cookies, but we all know cookie sizes are subjective!
 Sometimes vegan batters taste funny, and it's not until the finished product comes out of the oven that they taste good. THIS BATTER ISN'T LIKE THAT!!! It's sooo freaking delicious you can eat it raw. The best part about vegan baking is licking the beaters and not getting salmonella!
You're probably also wondering why I used both shortening and margarine, and not oil. For starters, oil is okay in some recipes, but generally I don't like to use it because I just don't like the consistency of the batter. I didn't use just shortening because I craved that buttery delicious flavor and I didn't use just margarine because I needed the texture that shortening offers. So, like many cookie recipes from the days of yore, I used a little of both! It really makes a difference. Try it!
 Look how nice they set up! They're not crumbly or hard (unless you bake them too long, ahem. Remember they continue to cook on the baking sheet even if you've removed them from the oven). I had a house full of non-vegans and they gobbled these babies up. They're perfect right out of the oven with some ricemilk. Man, with food like this, I have no reason to leave the vegan world! I love it!
Tuesday, May 18, 2010
California Rolls
So this past Mother's Day I gave my mom the gift of sushi, one of her favorite foods. I really don't make sushi that often, mostly because I'm not a fan of nori (though it is starting to grow on me). I really don't think it's necessary to buy a bamboo mat or sushi kit though unless you plan on making a lot of sushi on a regular basis. Since I don't, I found that the plastic wrap method works quite well for me. I did a step-by-step thing here so beginners can get an idea of what it takes to make a roll (or 5 or 10).
A few helpful hints:
California Rolls:
For the rice:
2 c. sushi rice
6 c. water
1/4 c. SEASONED rice vinegar
For the rolls:
1 cucumber, peeled, cut in half vertically, seeded, and cut into 1/4 in. wide strips
1 avocado, cut into thin strips
2 carrots, peeled, cut in half vertically, then cut into 1/4 in. wide strips
baked tofu, cut into small strips (about 1 in. wide x 2 in. long)
Nori
Wasabi
Toasted sesame seeds
1. Cook rice, stir in the rice vinegar while it's still hot, and let it cool to room temperature.
2. Meanwhile, cut up all the veggies and tofu.
3. Assemble rolls.
First, using tongs, toast the nori over a burner on the oven for about a minute. Make sure to get both sides.

Place seaweed rough side up, the longer edge facing you. Spread the rice over it. Sprinkle it with sesame seeds, the cover it with a section of plastic wrap. Press firmly to attach the plastic wrap to the rice. Flip the seaweed over.
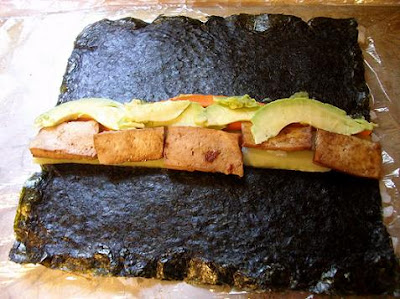 Add the wasabi paste in a thin strip down the middle (very thin!!!). I usually just dab it here and there then spread it out with my finger. Add the rest of the prepped ingredients to the seaweed, horizontally and to the center.
 Roll sushi very tightly and make sure you remove the plastic as you go. I'm not gonna like, roll it like you would a joint (if that helps, lol).

Wrap the finished roll in plastic wrap (I use the same piece) and place in the fridge. Chill until you're ready to eat it.

To cut the sushi, unwrap it then cut it with about 1/2 inch thickness. It helps to use a serrated knife that's dipped in vinegar or water between each slice. Serve chilled with wasabi and your choice of dipping sauces.
Mayo seems to be a popular dipping sauce, but it's not vegan. Here's a easy, peasy version of a mayo-based sauce that goes great with these California rolls:
1/2 c. vegan mayo
1/2 tsp. siracha (hot chili paste)
2-3 drops toasted sesame seed oil
To serve: mix all ingredients together. Chill until eating.
TA-DA! Sushi! And just so you know, this recipe makes a crap ton of sushi! You'll be eating on it for a minute!
A few helpful hints:
- Have rice cooked and cooled to room temperature
- Have vegetables chopped and prepared
- Have sesame seeds and wasabi already toasted/prepared
California Rolls:
For the rice:
2 c. sushi rice
6 c. water
1/4 c. SEASONED rice vinegar
For the rolls:
1 cucumber, peeled, cut in half vertically, seeded, and cut into 1/4 in. wide strips
1 avocado, cut into thin strips
2 carrots, peeled, cut in half vertically, then cut into 1/4 in. wide strips
baked tofu, cut into small strips (about 1 in. wide x 2 in. long)
Nori
Wasabi
Toasted sesame seeds
1. Cook rice, stir in the rice vinegar while it's still hot, and let it cool to room temperature.
2. Meanwhile, cut up all the veggies and tofu.
3. Assemble rolls.
First, using tongs, toast the nori over a burner on the oven for about a minute. Make sure to get both sides.

Place seaweed rough side up, the longer edge facing you. Spread the rice over it. Sprinkle it with sesame seeds, the cover it with a section of plastic wrap. Press firmly to attach the plastic wrap to the rice. Flip the seaweed over.
 Add the wasabi paste in a thin strip down the middle (very thin!!!). I usually just dab it here and there then spread it out with my finger. Add the rest of the prepped ingredients to the seaweed, horizontally and to the center.
 Roll sushi very tightly and make sure you remove the plastic as you go. I'm not gonna like, roll it like you would a joint (if that helps, lol).
Wrap the finished roll in plastic wrap (I use the same piece) and place in the fridge. Chill until you're ready to eat it.

To cut the sushi, unwrap it then cut it with about 1/2 inch thickness. It helps to use a serrated knife that's dipped in vinegar or water between each slice. Serve chilled with wasabi and your choice of dipping sauces.
Mayo seems to be a popular dipping sauce, but it's not vegan. Here's a easy, peasy version of a mayo-based sauce that goes great with these California rolls:
1/2 c. vegan mayo
1/2 tsp. siracha (hot chili paste)
2-3 drops toasted sesame seed oil
To serve: mix all ingredients together. Chill until eating.
TA-DA! Sushi! And just so you know, this recipe makes a crap ton of sushi! You'll be eating on it for a minute!
Wednesday, May 5, 2010
PIZZA From Scratch! Oh, and Some Sushi.
I love Pizza! That goes without saying. When I was younger, my family never really ate a lot of fast food or take-out, so pizza was always kind of a special occasion. When I was 16 I got a job at a certain well-known pizza chain, and from then on I developed a fancy for thin crust, but was very turned-off by the greasiness and lack of quality ingredients (they weren't bad for American standards, just not up to *my* standards, lol).
When I moved out on my own for the first time I went on a cook-from-scratch spree that included pizza crust. Luckily, I turned out to be awesome at following recipes so the made-from-scratch thing evolved into a lifelong thing... anyway...
I've tried a few different recipes for pizza crust, but this one is by far my favorite. It's pretty easy to make and pizza dough only has to rise once. I bet this recipe would also make some tasty breadsticks, but I haven't gotten around to that. I got this recipe from the Sunset Vegetarian cookbook. This cookbook is your yesteryear veg cookbook full of recipes for unappetizing things (you know, when vegetarian meant it had to be loaded with cheese and eggs as a meat substitute), but luckily, there's a few gems in there, and I'd like to work over a couple more.
 Note: I use Tone's Spicy Pizza Seasoning to give the crust a little flavor. It's a pretty nifty blend containing dehydrated onions, chili flakes, garlic, etc. If you want though, you can use 1 tsp. basil with the oregano for flavor.
Whole Wheat Pizza Crust:
1 package active dry yeast (or 2 1/4 tsp.)
1 1/2 c. warm water (about 110 degrees, like a hot tub, lol)
2 Tb. olive oil (but I usually use one)
1 tsp. salt
1 tsp. sugar
1 tsp. Tone's Spicy Pizza Seasoning
1 tsp. oregano
1/4 c. wheat germ (adds awesome)
1 1/2 c. whole wheat pastry flour or graham flour or whole wheat flour
1 1/2 c. unbleached, all-purpose flour
All-purpose flour for kneading
1. In a large bowl, dissolve yeast, water, and sugar.
2. Once the yeast is all foamy, about 5 minutes, add the oil, salt, sugar, oregano, Tone's, wheat germ, and whole wheat flour.
3. Mix with wooden spoon until all incorporated. Add enough all-purpose flour (out of the 1 1/2 cups) to the dough so that it holds together.
4. Turn out onto a lightly floured surfaced and knead until dough is smooth and elastic, about 5 minutes.
5. Place in a large, greased bowl, cover, and let rise in a warm place until the dough has doubled in size, about 45 minutes.
To make Pizzas:
1. Preheat the oven to 450.
2. Punch dough down and divide in half (or you can be like me and divide the dough into thirds to get three thin crust pizzas or you divide the dough into a 1/3 portion and a 2/3 portion to get one thin crust and one regular crust).
3. Roll out each dough portion to form a 14-inch circle, then transfer each circle onto a greased 14-inch pizza pan.
What I do is spray the pizza pan with some Olive Oil Pam and then roll the dough out directly onto the pan. Not only does this help keep the dough an even thickness but it saves you from having to pick up rolled out pizza dough from the table and then stretching it and then trying to fix it and stuff it onto the pan. That's no good.
4. Poke holes all over the crust with a fork, and then, one at a time, bake on next-to-bottom rack of the oven for about 7 minutes or just until the bottom of the crust starts to brown. During baking, watch carefully and prick any bubbles that form. Remove from oven and set aside.
5. Assemble pizzas!! Add sauce, veggies, vegan parmesan, a little more Tone's Spicy Pizza Seasoning, etc. and then bake in the oven for 12-15 minutes. Voila!
My favorite pizza?:
Black olives
Onions
Red, green, and yellow peppers
Artichokes
Roma tomatoes
Mushrooms
Broccoli (chopped into tiny florets)

Oh yeah! I almost forgot! SUSHI! I'm making my mom some vegan sushi for Mother's Day. She loves Sushi so I'm gonna go up to her house and we're gonna make it together. Should be an interesting time! The recipe is for California Rolls, little nori-wrapped rolls with tofu, cucumber, carrots, and avocado. I'll post the recipe soon!
When I moved out on my own for the first time I went on a cook-from-scratch spree that included pizza crust. Luckily, I turned out to be awesome at following recipes so the made-from-scratch thing evolved into a lifelong thing... anyway...
I've tried a few different recipes for pizza crust, but this one is by far my favorite. It's pretty easy to make and pizza dough only has to rise once. I bet this recipe would also make some tasty breadsticks, but I haven't gotten around to that. I got this recipe from the Sunset Vegetarian cookbook. This cookbook is your yesteryear veg cookbook full of recipes for unappetizing things (you know, when vegetarian meant it had to be loaded with cheese and eggs as a meat substitute), but luckily, there's a few gems in there, and I'd like to work over a couple more.
 Note: I use Tone's Spicy Pizza Seasoning to give the crust a little flavor. It's a pretty nifty blend containing dehydrated onions, chili flakes, garlic, etc. If you want though, you can use 1 tsp. basil with the oregano for flavor.
Whole Wheat Pizza Crust:
1 package active dry yeast (or 2 1/4 tsp.)
1 1/2 c. warm water (about 110 degrees, like a hot tub, lol)
2 Tb. olive oil (but I usually use one)
1 tsp. salt
1 tsp. sugar
1 tsp. Tone's Spicy Pizza Seasoning
1 tsp. oregano
1/4 c. wheat germ (adds awesome)
1 1/2 c. whole wheat pastry flour or graham flour or whole wheat flour
1 1/2 c. unbleached, all-purpose flour
All-purpose flour for kneading
1. In a large bowl, dissolve yeast, water, and sugar.
2. Once the yeast is all foamy, about 5 minutes, add the oil, salt, sugar, oregano, Tone's, wheat germ, and whole wheat flour.
3. Mix with wooden spoon until all incorporated. Add enough all-purpose flour (out of the 1 1/2 cups) to the dough so that it holds together.
4. Turn out onto a lightly floured surfaced and knead until dough is smooth and elastic, about 5 minutes.
5. Place in a large, greased bowl, cover, and let rise in a warm place until the dough has doubled in size, about 45 minutes.
To make Pizzas:
1. Preheat the oven to 450.
2. Punch dough down and divide in half (or you can be like me and divide the dough into thirds to get three thin crust pizzas or you divide the dough into a 1/3 portion and a 2/3 portion to get one thin crust and one regular crust).
3. Roll out each dough portion to form a 14-inch circle, then transfer each circle onto a greased 14-inch pizza pan.
What I do is spray the pizza pan with some Olive Oil Pam and then roll the dough out directly onto the pan. Not only does this help keep the dough an even thickness but it saves you from having to pick up rolled out pizza dough from the table and then stretching it and then trying to fix it and stuff it onto the pan. That's no good.

4. Poke holes all over the crust with a fork, and then, one at a time, bake on next-to-bottom rack of the oven for about 7 minutes or just until the bottom of the crust starts to brown. During baking, watch carefully and prick any bubbles that form. Remove from oven and set aside.
DO NOT SKIP THIS STEP. "7 minutes," you say, "must not be that important. I'll just cook the whole pizza together." WRONG. If you skip the prebake step, you wind up with a nasty, doughy mess. If you wouldn't skip it for a pie, don't skip it for a pizza!
 Pizza crusts in all their baked gloriousness.
 Pizza crusts in all their baked gloriousness.
5. Assemble pizzas!! Add sauce, veggies, vegan parmesan, a little more Tone's Spicy Pizza Seasoning, etc. and then bake in the oven for 12-15 minutes. Voila!
My favorite pizza?:
Black olives
Onions
Red, green, and yellow peppers
Artichokes
Roma tomatoes
Mushrooms
Broccoli (chopped into tiny florets)

Oh yeah! I almost forgot! SUSHI! I'm making my mom some vegan sushi for Mother's Day. She loves Sushi so I'm gonna go up to her house and we're gonna make it together. Should be an interesting time! The recipe is for California Rolls, little nori-wrapped rolls with tofu, cucumber, carrots, and avocado. I'll post the recipe soon!
Subscribe to:
Comments (Atom)